Hello Friends,
Sunday 1 February 2015
Sunday, February 01, 2015
Monday 19 January 2015
Monday, January 19, 2015
Android Custom Horizontal progress bar | Custom Progress bar
Hello Friends,
Today,I am going to share my another blog which helps you in customizing
Horizontal Progress Bar.With the help of this Android tutorial we can also implement
the Android PI Chart view with multiple color.
Actually my need to show some PI Chart like view with multiple different color which fills
dynamically base on the percentage, without using any 3rd party library. So , I first go
with Horizontal progress bar but in horizontal progress bar only show up-to two level
progress with different color.
Finally, I have written a custom progress bar code using android seek bar. Using this we
can add "N level" of different color with different percentage.And Its very simple and
easily understandable.
Here is my code :
1. MainActivity.java
2. ProgressItem.java
Download complete Source code : CustomProgress Bar
Hope , this will helps some one .
Enjoy Coding... :)
Today,I am going to share my another blog which helps you in customizing
Horizontal Progress Bar.With the help of this Android tutorial we can also implement
the Android PI Chart view with multiple color.
Actually my need to show some PI Chart like view with multiple different color which fills
dynamically base on the percentage, without using any 3rd party library. So , I first go
with Horizontal progress bar but in horizontal progress bar only show up-to two level
progress with different color.
Finally, I have written a custom progress bar code using android seek bar. Using this we
can add "N level" of different color with different percentage.And Its very simple and
easily understandable.
 |
| Horizontal Progress bar |
Here is my code :
1. MainActivity.java
package com.android.customprogressbar;

import java.util.ArrayList;

import android.app.Activity;
import android.os.Bundle;
import android.util.Log;
import android.view.Menu;

public class MainActivity extends Activity {

 private CustomProgressBar seekbar;
 private ArrayList progressItemList;
 private ProgressItem mProgressItem;

 @Override
 protected void onCreate(Bundle savedInstanceState) {
  super.onCreate(savedInstanceState);
  setContentView(R.layout.activity_main);
  seekbar = ((CustomProgressBar) findViewById(R.id.seekBar0));
  seekbar.getThumb().mutate().setAlpha(0);
  initDataToSeekbar();
 }

 private void initDataToSeekbar() {
  progressItemList = new ArrayList();
  // red span
  mProgressItem = new ProgressItem();
  mProgressItem.progressItemPercentage = 20;
  Log.i("Mainactivity", mProgressItem.progressItemPercentage + "");
  mProgressItem.color = R.color.red;
  progressItemList.add(mProgressItem);
  // blue span
  mProgressItem = new ProgressItem();
  mProgressItem.progressItemPercentage = 25;
  mProgressItem.color = R.color.blue;
  progressItemList.add(mProgressItem);
  // green span
  mProgressItem = new ProgressItem();
  mProgressItem.progressItemPercentage = 35;
  mProgressItem.color = R.color.green;
  progressItemList.add(mProgressItem);

  //white span
  mProgressItem = new ProgressItem();
  mProgressItem.progressItemPercentage = 20;
  mProgressItem.color =  R.color.white;
  progressItemList.add(mProgressItem);


  seekbar.initData(progressItemList);
  seekbar.invalidate();
 }

 @Override
 public boolean onCreateOptionsMenu(Menu menu) {
  getMenuInflater().inflate(R.menu.main, menu);
  return true;
 }
}
2. CustomProgressBar.java
package com.android.customprogressbar;

import java.util.ArrayList;

import android.content.Context;
import android.graphics.Canvas;
import android.graphics.Paint;
import android.graphics.Rect;
import android.util.AttributeSet;
import android.widget.SeekBar;

public class CustomProgressBar extends SeekBar {

 private ArrayList mProgressItemsList;

 public CustomProgressBar(Context context) {
  super(context);
  mProgressItemsList = new ArrayList();
 }

 public CustomProgressBar(Context context, AttributeSet attrs) {
  super(context, attrs);
 }

 public CustomProgressBar(Context context, AttributeSet attrs, int defStyle) {
  super(context, attrs, defStyle);
 }

 public void initData(ArrayList progressItemsList) {
  this.mProgressItemsList = progressItemsList;
 }

 @Override
 protected synchronized void onMeasure(int widthMeasureSpec,
   int heightMeasureSpec) {
  // TODO Auto-generated method stub
  super.onMeasure(widthMeasureSpec, heightMeasureSpec);
 }

 protected void onDraw(Canvas canvas) {
  if (mProgressItemsList.size() > 0) {
   int progressBarWidth = getWidth();
   int progressBarHeight = getHeight();
   int thumboffset = getThumbOffset();
   int lastProgressX = 0;
   int progressItemWidth, progressItemRight;
   for (int i = 0; i < mProgressItemsList.size(); i++) {
    ProgressItem progressItem = mProgressItemsList.get(i);
    Paint progressPaint = new Paint();
    progressPaint.setColor(getResources().getColor(
      progressItem.color));

    progressItemWidth = (int) (progressItem.progressItemPercentage
      * progressBarWidth / 100);

    progressItemRight = lastProgressX + progressItemWidth;

    // for last item give right to progress item to the width
    if (i == mProgressItemsList.size() - 1
      && progressItemRight != progressBarWidth) {
     progressItemRight = progressBarWidth;
    }
    Rect progressRect = new Rect();
    progressRect.set(lastProgressX, thumboffset / 2,
      progressItemRight, progressBarHeight - thumboffset / 2);
    canvas.drawRect(progressRect, progressPaint);
    lastProgressX = progressItemRight;
   }
   super.onDraw(canvas);
  }

 }

}
2. ProgressItem.java
package com.android.customprogressbar;

public class ProgressItem {
 public int color;
 public float progressItemPercentage;
}
Download complete Source code : CustomProgress Bar
Hope , this will helps some one .
Enjoy Coding... :)
Sunday 24 August 2014
Sunday, August 24, 2014
Android navigation drawer tutorial | Android navigation drawer with activities | Android Sliding Navigation Drawer – Example
Hello Droid Guys
Today, I am going to share the tutorial of "Android sliding navigation drawer". You also find many tutorial on Google which helps you to show navigation drawer but most of them are using fragment to do that. Here, are the few good tutorial which I follows:
1. https://developer.android.com/design/patterns/navigation-drawer.html
2. http://www.androidhive.info/2013/11/android-sliding-menu-using-navigation-drawer/
Here, I am going show sliding menu using activity. We can also achieve
the functionality of Navigation drawer with activities.
This Android tutorial describes How to implement a navigation drawer using Support Library the DrawerLayout API.
1. Create Drawer Layout :
To create a navigation drawer, We first declare user interface with a
DrawerLayout as the root view of layout.
Inside the Drawer Layout, add one view that contains the main content for the
screen (your primary layout when the drawer is hidden) and another view that
contains the contents of the navigationdrawer. In this example, I am using a DrawerLayout
with two child. One a Relative layout with webView(the main content), and other
with a ListView for the navigation drawer. The webview is my activity content view.
2. Initialize the Drawer List :
3. Handle Navigation List click event :
Download Code : Navigation Drawer Demo
Hope this will help someone.
Enjoy Coding... :)
Today, I am going to share the tutorial of "Android sliding navigation drawer". You also find many tutorial on Google which helps you to show navigation drawer but most of them are using fragment to do that. Here, are the few good tutorial which I follows:
 |
| Navigation drawer activity |
1. https://developer.android.com/design/patterns/navigation-drawer.html
2. http://www.androidhive.info/2013/11/android-sliding-menu-using-navigation-drawer/
Here, I am going show sliding menu using activity. We can also achieve
the functionality of Navigation drawer with activities.
This Android tutorial describes How to implement a navigation drawer using Support Library the DrawerLayout API.
1. Create Drawer Layout :
To create a navigation drawer, We first declare user interface with a
DrawerLayout as the root view of layout.
Inside the Drawer Layout, add one view that contains the main content for the
screen (your primary layout when the drawer is hidden) and another view that
contains the contents of the navigationdrawer. In this example, I am using a DrawerLayout
with two child. One a Relative layout with webView(the main content), and other
with a ListView for the navigation drawer. The webview is my activity content view.
<?xml version="1.0" encoding="utf-8"?>
<android.support.v4.widget.DrawerLayout

    xmlns:android="http://schemas.android.com/apk/res/android"

    android:id="@+id/drawer_layout"

    android:layout_width="match_parent"

    android:layout_height="match_parent" >
    <!--
          main content
     -->

    <RelativeLayout

        android:layout_width="fill_parent"

        android:layout_height="fill_parent"

        android:background="#ffffff" >

        <WebView

            android:id="@+id/webview"

            android:layout_width="fill_parent"

            android:layout_height="fill_parent"

            android:background="#ffffff" />

    </RelativeLayout>

    <!--
        navigation list item
    -->
    <FrameLayout

        android:id="@+id/content_frame"

        android:layout_width="match_parent"

        android:layout_height="match_parent" />

    <ListView

        android:id="@+id/left_drawer"

        android:layout_width="240dp"

        android:layout_height="match_parent"

        android:layout_gravity="left"

        android:background="#2A323D"

        android:cacheColorHint="#00000000"

        android:choiceMode="singleChoice" />


</android.support.v4.widget.DrawerLayout>
2. Initialize the Drawer List :
mDrawerLayout = (DrawerLayout) findViewById(R.id.drawer_layout);
mDrawerList = (ListView) findViewById(R.id.left_drawer);

mDrawerLayout.setDrawerShadow(R.drawable.drawer_shadow,
		GravityCompat.START);
// set up the drawer's list view with items and click listener
mDrawerList.setAdapter(new MenuDrawerListAdapter(this, menuItemTitles,
			Config.drawerMenuItemsIconIds));
mDrawerList.setOnItemClickListener(new DrawerItemClickListener());
3. Handle Navigation List click event :
/* The click listener for ListView in the navigation drawer */
public class DrawerItemClickListener implements
	ListView.OnItemClickListener {
	@Override
	public void onItemClick(AdapterView parent, View view, int position,
		long id) {
		switch (position) {
		case 0: {
		Intent main = new Intent(getApplicationContext(),
				MainActivity.class);
		startActivity(main);
		finish();
		break;
        	}
		case 1: {
		Intent list = new Intent(getApplicationContext(),
				ListActivity.class);
		startActivity(list);
		finish();
		break;
		}

		default:
		break;
         }
	}
}
Download Code : Navigation Drawer Demo
Hope this will help someone.
Enjoy Coding... :)
Sunday 10 August 2014
Sunday, August 10, 2014
Android Download Source code | Android Sample Project
Hello Friends,
This is my small contribution , Now I am sharing the source code of all my android
post or android tutorial at one place.
This is my small contribution , Now I am sharing the source code of all my android
post or android tutorial at one place.
| Android Tutorial | Download Code |
|---|---|
| Android Custom Calendar | Download Code |
| Android LinkedIn Integration | Download Code |
| Android Crop Image in circular shape like gmail and facebook | Download Code |
| Android facebook like left to right slide navigation | Download Code |
| Android facebook and skype like animated splash screen | Download Code |
| Google map V2 sample with draw polygon or draw geometry and save polygon | Download Code |
| Android video Player | Download Code |
| Android navigation drawer tutorial | Download Code |
| Android Custom Horizontal progress bar |"N" level Horizontl Progress Bar | Download Code |
Sunday 20 July 2014
Sunday, July 20, 2014
Android Splash Screen Example with Animation | Animated Splash Screen android
Hello Friends,
Today, I am going to share the tutorial of android splash screen with animation.
With help of this tutorial you can easily implement the facebook like splash screen
or skype like splash screen.
1. Create an Android Project "SplashScreen"
2. Create an folder "anim" inside the res folder
3. Create two file inside the "anim" folder
a. alpha.xml
b. translate.xml
4. inside your oncreate() called this method
Download the code : Android animate splash sreen
Hope this will help someone
Enjoy Coding.... :)
Today, I am going to share the tutorial of android splash screen with animation.
With help of this tutorial you can easily implement the facebook like splash screen
or skype like splash screen.
 |
| Android animated splash screen |
1. Create an Android Project "SplashScreen"
2. Create an folder "anim" inside the res folder
3. Create two file inside the "anim" folder
a. alpha.xml
         <?xml version="1.0" encoding="utf-8"?>

              <alpha
              xmlns:android="http://schemas.android.com/apk/res/android"
              android:fromAlpha="0.0"
              android:toAlpha="1.0"
              android:duration="3000" />
b. translate.xml
<?xml version="1.0" encoding="utf-8"?>

         <set

              xmlns:android="http://schemas.android.com/apk/res/android">
             <translate
                 xmlns:android="http://schemas.android.com/apk/res/android"
                 android:fromXDelta="0%"
                 android:toXDelta="0%"
                 android:fromYDelta="900%"
                 android:toYDelta="0%"
                 android:duration="2000"
                 android:zAdjustment="top" />
         </set>
4. inside your oncreate() called this method
public class SpalshScreenActivity extends Activity {

    /** Called when the activity is first created. */

    @Override
    public void onCreate(Bundle savedInstanceState) {

        super.onCreate(savedInstanceState);
        setContentView(R.layout.main);
        StartAnimations();

    }
     ................
     ................

  }
      private void StartAnimations() {
    	Animation anim = AnimationUtils.loadAnimation(this, R.anim.alpha);
		anim.reset();
		LinearLayout l = (LinearLayout) findViewById(R.id.lin_lay);
		l.clearAnimation();
		l.startAnimation(anim);

		anim = AnimationUtils.loadAnimation(this, R.anim.translate);
		anim.reset();
		ImageView iv = (ImageView) findViewById(R.id.logo);
		iv.clearAnimation();
		iv.startAnimation(anim);

		anim = AnimationUtils.loadAnimation(this, R.anim.translate);
		anim.reset();
		LinearLayout l2 = (LinearLayout) findViewById(R.id.linear2);
		l2.setVisibility(View.VISIBLE);
		l2.clearAnimation();
		l2.startAnimation(anim);
    }
Download the code : Android animate splash sreen
Hope this will help someone
Enjoy Coding.... :)
Sunday, July 20, 2014
ActiveAndroid Tutorial | ActiveAndroid: Android ORM base database |Getting Started with ActiveAndroid - Part1
ActiveAndrid :
ActiveAndroid is an ORM (object relational mapper) . Which allows you to save(insert)
and retrieve(read) SQLite database records without even writing a single SQL statement.
Each database record is wrapped neatly into a class with methods like save().
It is same a Java Hibernate. It also based on annotation like: @Column(name="Column") for creating column and Table(name = "Table") for creating table .
Getting started :
A.Now here we are going to start integrating ActiveAndroid in your project.
1. Download the ActiveAndroid library
2. Now generate the ActiveAndroid.jar by executing ant in root folder
3. If you are unable to generate the jar file then download it from here
Now, we have ActiveAndroid.jar file. Now, we can add it inside the "libs" folder of
Android Project.
B. Configuring Android Project with ActiveAndroid :
1. Open the AndroidManifest.xml file located at the root directory of your Android project.
Note: In your manifest.xml, if you are not using any Custom Application class then the application name points to the ActiveAndroid application class as we are doing above. But if you are using any Application levele custom class then your Custom Application class must extend com.activeandroid.app.Application instead of android.app.Application.
And initialize and dispose ActiveAndroid in the Application class.
Note : If you want to create your db in a specific location inside your Sd Card then change below line in manifest.xml
So that we can easily import it in Sqlite Browser .
 |
| Active Android |
ActiveAndroid is an ORM (object relational mapper) . Which allows you to save(insert)
and retrieve(read) SQLite database records without even writing a single SQL statement.
Each database record is wrapped neatly into a class with methods like save().
It is same a Java Hibernate. It also based on annotation like: @Column(name="Column") for creating column and Table(name = "Table") for creating table .
Getting started :
A.Now here we are going to start integrating ActiveAndroid in your project.
1. Download the ActiveAndroid library
2. Now generate the ActiveAndroid.jar by executing ant in root folder
3. If you are unable to generate the jar file then download it from here
Now, we have ActiveAndroid.jar file. Now, we can add it inside the "libs" folder of
Android Project.
B. Configuring Android Project with ActiveAndroid :
1. Open the AndroidManifest.xml file located at the root directory of your Android project.
<manifest xmlns:android="http://schemas.android.com/apk/res/android"
    package="com.android.developer.solutions"
    android:versionCode="1"
    android:versionName="1.0" >
        <application
           android:name="com.activeandroid.app.Application"
           android:allowBackup="true"
           android:icon="@drawable/ic_launcher"
           android:label="@string/app_name"
           android:theme="@style/AppTheme" >
           <activity
             android:name=".MainActivity"
             android:label="@string/app_name"
             android:screenOrientation="landscape" >
             <intent-filter>
               <action android:name="android.intent.action.MAIN" />
               <category android:name="android.intent.category.LAUNCHER" />
             </intent-filter>
          </activity>

         <meta-data android:name="AA_DB_NAME" android:value="Student.db" />
         <meta-data android:name="AA_DB_VERSION" android:value="1" />
        </application>
</manifest>
Note: In your manifest.xml, if you are not using any Custom Application class then the application name points to the ActiveAndroid application class as we are doing above. But if you are using any Application levele custom class then your Custom Application class must extend com.activeandroid.app.Application instead of android.app.Application.
public class MyApplication extends com.activeandroid.app.Application { ...
And initialize and dispose ActiveAndroid in the Application class.
public class MyApplication extends com.activeandroid.app.Application {

    @Override
    public void onCreate() {
        super.onCreate();
        ActiveAndroid.initialize(this);
    }

    @Override
    public void onTerminate() {
        super.onTerminate();
        ActiveAndroid.dispose();
    }
}
Note : If you want to create your db in a specific location inside your Sd Card then change below line in manifest.xml
<meta-data android:name="AA_DB_NAME" android:value="/sdcard/Student.db" />

<meta-data android:name="AA_DB_VERSION" android:value="1" />
Here, we are creating our database file inside the sd card root folder.
So that we can easily import it in Sqlite Browser .
Tuesday 8 July 2014
Tuesday, July 08, 2014
Android Google Glass Configuration | Glass Development Kit | Android Google Glass Setup | Android Google Glass Development -Part1
Hello Friend ,
This is my first blog on Android Google Glass . Lats month Google launches
some awesome feature like:
 1. Android L Developer Preview
2. Android Wear SDK
3. Android TV Preview SDK
4. Google glass
For more Detail Check this link
This is my first blog on Android Google Glass . Lats month Google launches
some awesome feature like:
2. Android Wear SDK
3. Android TV Preview SDK
4. Google glass
Today, I am going to share my small tutorial on Google glass which helps you in
in Configuring the Google glass development environment in Eclipse.
Glass Development Kit : First you need GDK
The Glass Development Kit (GDK) is an add-on to the Android SDK that lets you build Glassware that runs directly on Glass.
Steps to setup Google Glass Development :
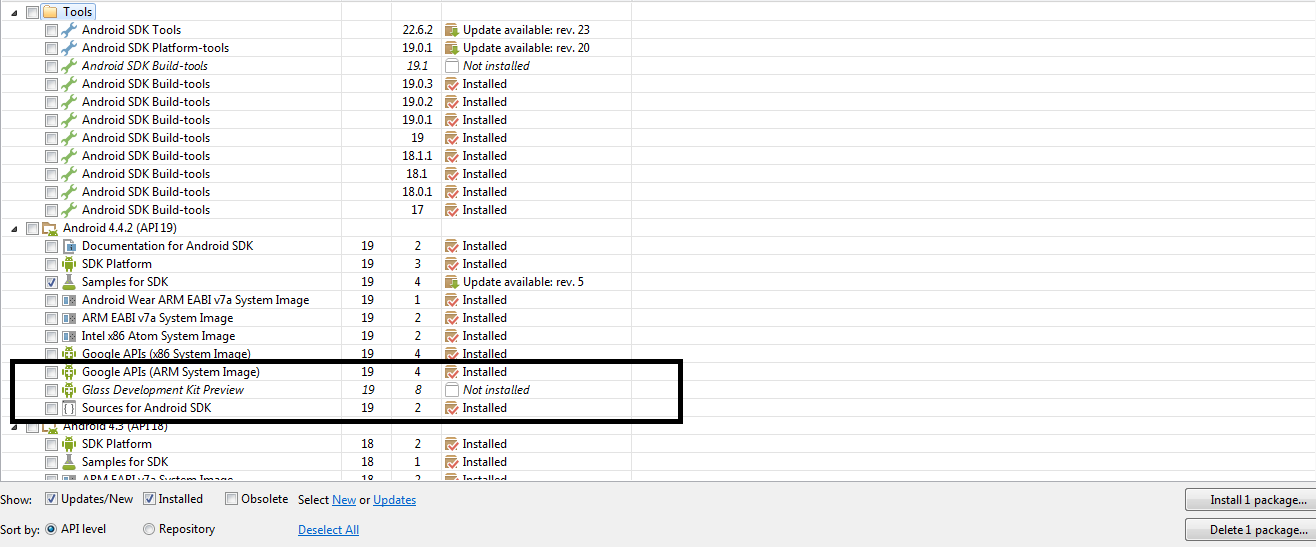
1.Get the Android 4.4.2 (API 19) SDK and Glass Development Kit Preview
add-on from the Android SDK Manager. see the image
2. On Glass, turn on USB debugging (Settings > Device Info > Turn on debug).
3. Import some GDK samples with the File > New Project > Android Sample Project menu.
4. When you're ready to create a project for your own Glassware, use these settings:
- Minimum and Target SDK Versions: 19 (There is only one Glass version,
so minimum and target SDK are the same.)
- Compile with: Glass Development Kit Developer Preview
- Theme: None (ADT and Android Studio usually assign a theme automatically,
even if you specify no theme, so remove the android:theme property from your manifest after
creating a project.)
For more Detail Check this link
https://developers.google.com/glass/develop/gdk/quick-start
2. Android Google Glass Development -Part2 - (coming soon)
Hope, this will helps someone.
Enjoy Coding..... :)
Hope, this will helps someone.
Enjoy Coding..... :)
Subscribe to:
Posts
(
Atom
)


